Web Scraping with PHP
PHP is a widely-used programming language that is known for its ease of use and server-side execution capabilities. This makes it an ideal choice for developing web scrapers, as it allows you to offload the execution of the scraper from your local machine to the server’s resources. Additionally, PHP’s integration with scheduling tools like Crontab enables you to set up automated scraping tasks that run at regular intervals.
This article delves into the comprehensive process of creating a PHP web scraper, encompassing everything from setting up the development environment and installing the necessary components to making web requests, parsing data, and saving the extracted information to a file. We also explore both basic scraping techniques and advanced strategies to enhance the efficiency and usefulness of your scraper.
Why Use PHP for Web Scraping?
PHP is a powerful object-oriented programming language designed specifically for web development. Thanks to its user-friendly syntax, it’s easy to learn and understand, even for beginners. PHP is not only user-friendly, but it also has exceptional performance, allowing PHP scripts to execute quickly and efficiently.
Overall, PHP offers the perfect combination of simplicity, speed, and versatility. PHP boasts a large and active community, along with a rich collection of open-source libraries dedicated to web scraping, such as Simple HTML DOM Parser, Goutte, and Symfony Panther
An important aspect is its server-side execution (PHP scripts can be executed directly on servers, eliminating the need for local installations or browser automation), making it ideal for web scraping tasks that need to run efficiently without relying on your local machine.
Setting Up the Environment
To create a PHP scraper, we need to set up PHP and download the libraries we will include later in our projects. However, there are two options on how we can do this. You can manually download all the libraries and configure the initialization file or automate it using Composer.
Since we aim to simplify script creation as much as possible and show you how to do it, we will install Composer and explain how to use it.
Installing PHP on Linux & MacOS
The process for installing PHP on both Linux and macOS is quite similar. First, open a terminal window and ensure your system’s package information is up-to-date using the following command:
sudo apt updateOnce the package information is updated, proceed with installing PHP using the following command:
sudo apt install php-cliThis command will install the latest version of PHP along with the necessary dependencies.
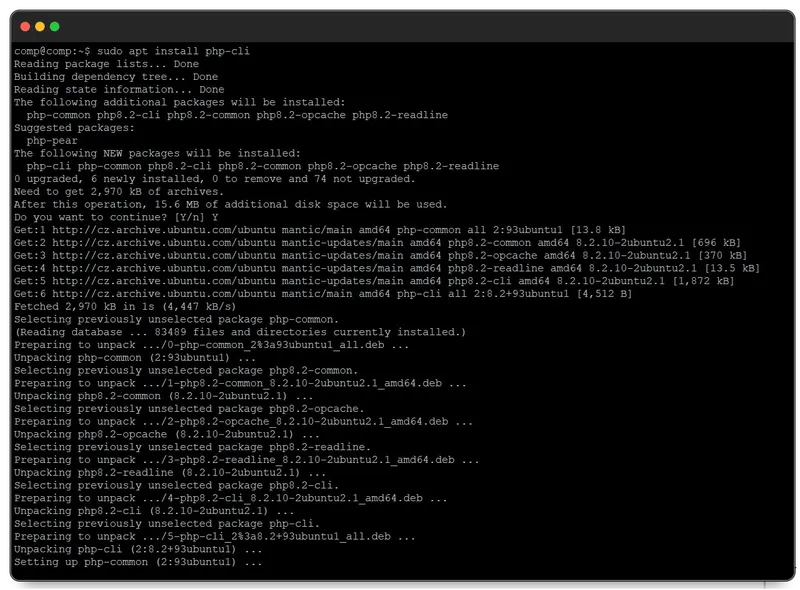
After that, you can use the installed PHP to run scripts.
Installing PHP on Windows
To get started, download PHP from the official website. If you have Windows, download the latest stable version as a zip archive. Then unzip it in a convenient place to remember, such as the “PHP” folder on your C drive.
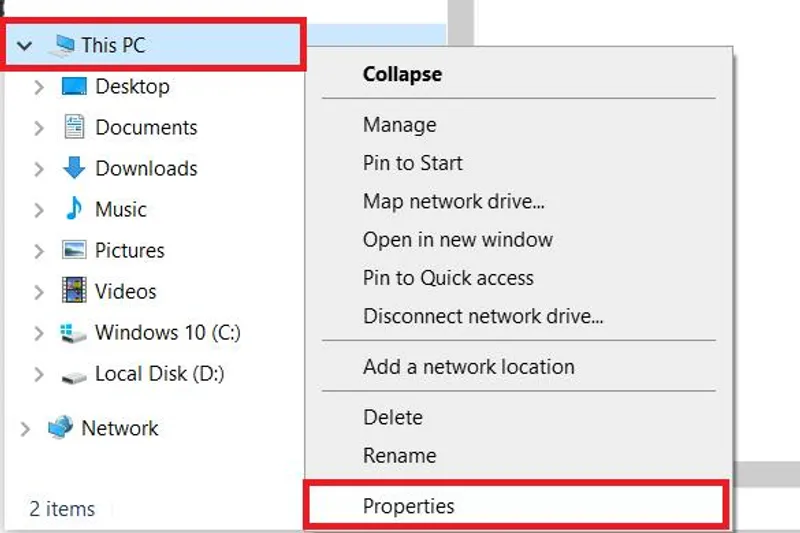
If you are using Windows, you need to set the path to the PHP files in your system. To do this, open any folder on your computer and go to the system settings (right-click on this PC and go to properties).
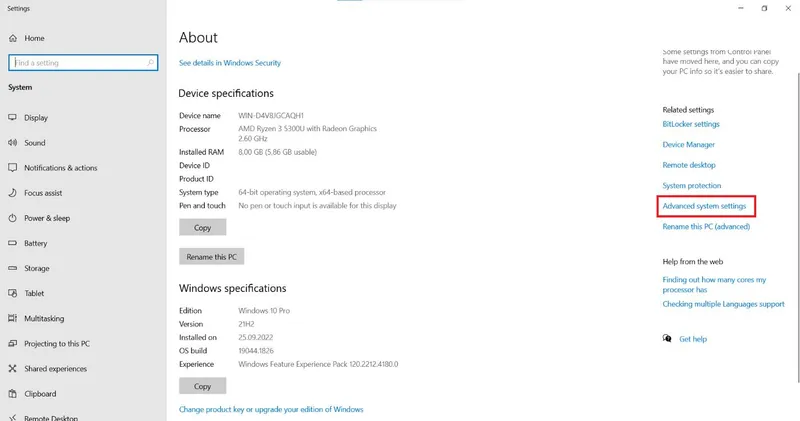
Find the “Advanced system settings” option on the page and click on it.
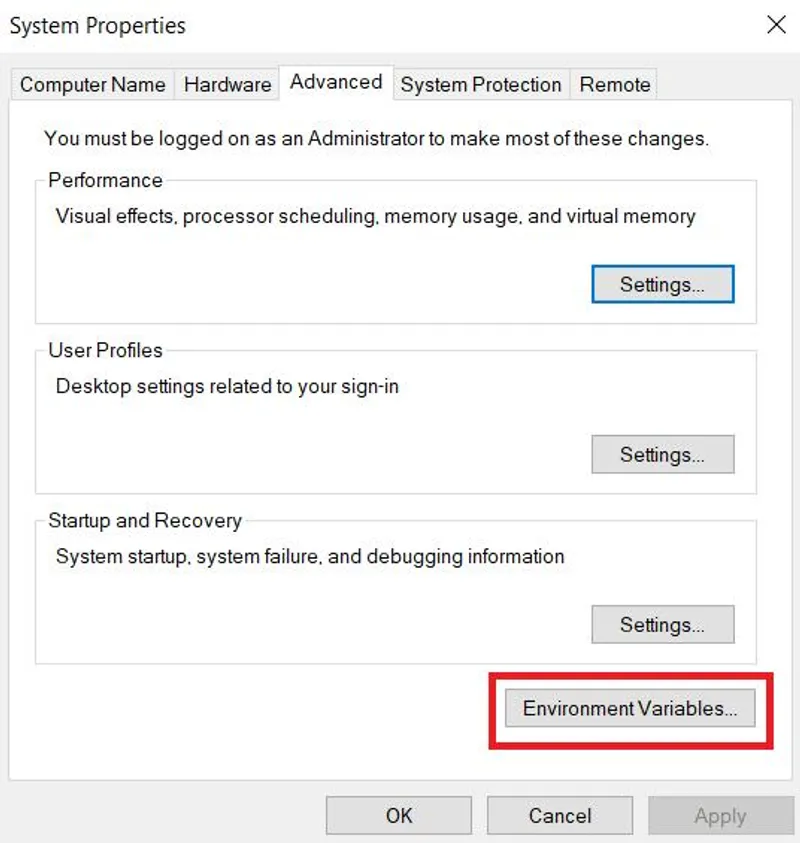
On the “Advanced” tab, look for the “Environment Variables” button and click on it.
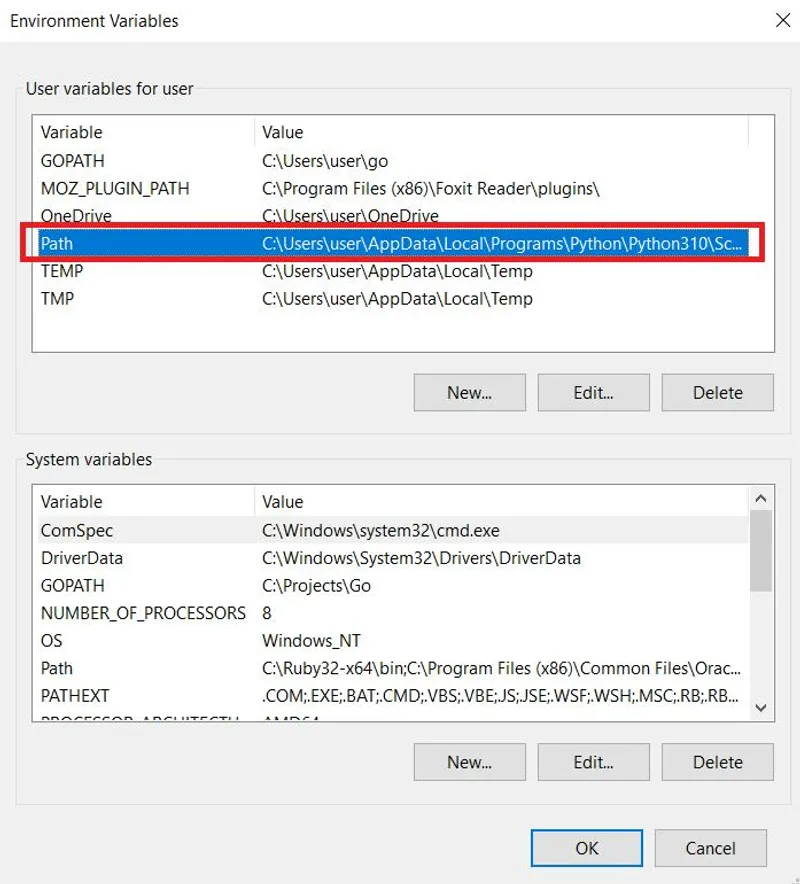
In the “User variables for user” section, find the “Path” variable and click on the “Edit” button.
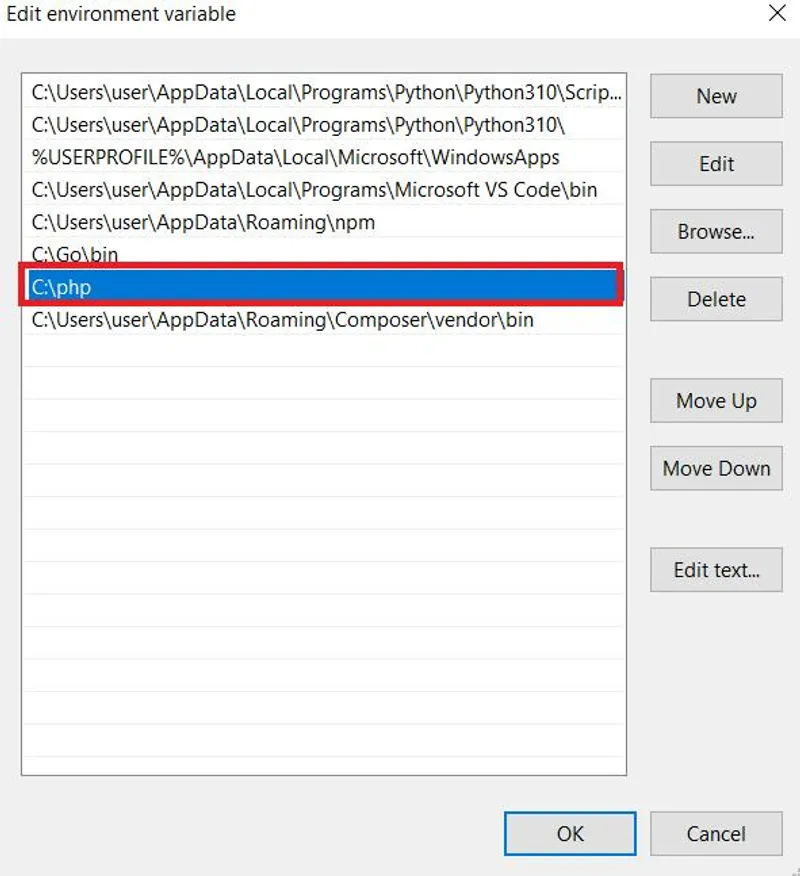
A new window will open where you can edit the value of the “Path” variable. Add the path to the PHP files at the end of the existing value. Click on the “OK” button to save the changes. If you still have questions, you can read the documentation.
Now let’s install Composer, a dependency manager for PHP that simplifies managing and installing third-party libraries in your project. You can download all packages from github.com, but based on our experience, Composer is more convenient.
To start, go to the official website and download Composer. Then, follow the instructions in the installation file. You will also need to specify the path where PHP is located, so make sure it is correctly set.
In the root directory of your project, create a new file called composer.json. This file will contain information about the dependencies of your project. We have prepared a single file that includes all the libraries used in today’s tutorial so you can our settings.
{
    "require": {
        "guzzlehttp/guzzle": "^7.7",
        "sunra/php-simple-html-dom-parser": "^1.5"
    },

    "config": {
        "platform": {
            "php": "8.2.7"
        },
        "preferred-install": {
            "*": "dist"
        },
        "minimum-stability": "stable",
        "prefer-stable": true,
        "sort-packages": true
    }
}
To begin, navigate to the directory that contains the composer.json file in the command line, and run the command:
composer installThe composer will download the specified dependencies and install them in the vendor directory of your project.
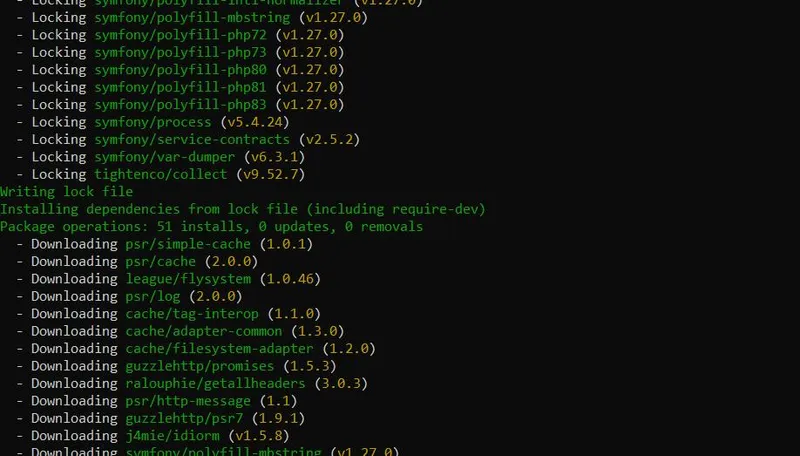
You can now import these libraries into your project using one command in the file with your code.
require 'vendor/autoload.php';Now you can use classes from the installed libraries simply by calling them in your code
Basic Web Scraping with PHP
Parsing simple websites typically involves utilizing a basic request and parsing library. For making requests, we’ll use the cURL (Client URL Library) library, and for parsing retrieved HTML pages, we’ll use the Simple HTML DOM Parser library. This approach introduces basic examples and aids in understanding simple page scraping techniques.
Unfortunately, not all websites allow for such effortless data scraping. Therefore, you may need to use more advanced libraries in the future. To simplify the selection of the most suitable library for your needs, we’ve compiled a separate article outlining all popular PHP scraping libraries.
Page Analysis
Now that we have prepared the environment and set up all the components let’s analyze the web page we will scrape. We will use this demo website as an example. Go to the website and open the developer console (F12 or right-click and go to Inspect).
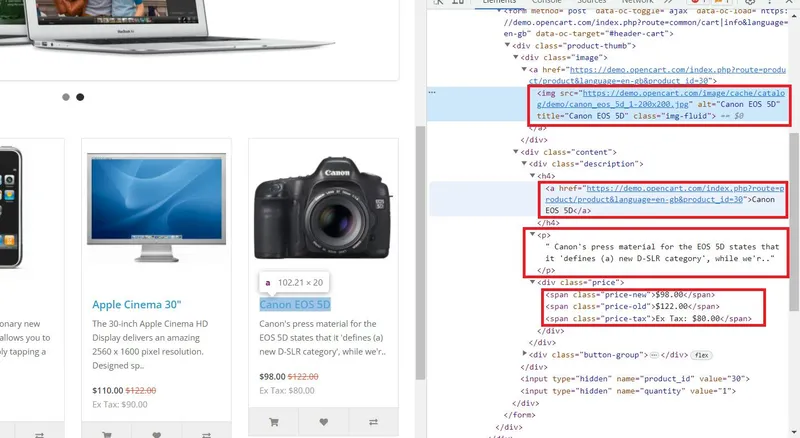
Here, we can see that all the necessary data is stored in the parent tag “div” with the class name “col,” which contains all the products on the page. It includes the following information:
- The “img” tag holds the link to the product image in the “src” attribute.
- The “a” tag contains the product link in the “href” attribute.
- The “h4” tag contains the product title.
- The “p” tag contains the product description.
- Prices are stored in the “span” tag with various classes:
- “Price-old” for the original price.
- “Price-new” for the discounted price.
- “Price-tax” for the tax.
Now that we know where the information we need is stored, we can start scraping.
Using cURL to Fetch Web Pages
The cURL library provides a wide range of functionality for managing requests. It is excellent for retrieving the code of pages from which data needs to be collected. In addition, it allows you to manage data, such as using SSL certificate verification when making a request or adding additional options, such as User Agents.
To better understand the capabilities of this library, let’s get the HTML code of the previously discussed website. To do this, create a new file with the *.php extension and initialize cURL:
<?php
$ch = curl_init();
// Here will be code
?>
Next, specify the website address and data type as parameters, for example, in the form of a string:
curl_setopt($ch, CURLOPT_URL, "https://demo.opencart.com");
curl_setopt($ch, CURLOPT_RETURNTRANSFER, true);
You can also specify various additional parameters as options at this stage, such as:
1. User Agents. You can take one of the latest User Agents from our page and specify them in your script.
curl_setopt($ch, CURLOPT_USERAGENT, "Mozilla/5.0 (Windows NT 10.0; Win64; x64) AppleWebKit/537.36 (KHTML, like Gecko) Chrome/124.0.0.0 Safari/537.36");2. Manage SSL certificates and disable their verification:
curl_setopt($ch, CURLOPT_SSL_VERIFYPEER, false);
curl_setopt($ch, CURLOPT_SSL_VERIFYHOST, false);
Or specify the path to the CA bundle:
curl_setopt($ch, CURLOPT_CAINFO, "/cacert.pem");3. Configure timeouts.
curl_setopt($ch, CURLOPT_TIMEOUT, 30); // Maximum time in seconds to allow cURL functions to execute
curl_setopt($ch, CURLOPT_CONNECTTIMEOUT, 10); // Maximum time in seconds to wait while trying to connect
4. Manage cookies. You can save them to a file:
curl_setopt($ch, CURLOPT_COOKIEJAR, "cookies.txt");Also, you can use them from a file:
curl_setopt($ch, CURLOPT_COOKIEFILE, "cookies.txt");Once you have configured your request, you need to execute it:
$response = curl_exec($ch);Next, we will display the query result or an error message, if any, on the screen:
if ($response === false) {
    echo 'cURL error: ' . curl_error($ch);
} else {
    echo $response;
}
Be sure to close the connection at the end:
curl_close($ch);Let’s keep only the necessary parameters and provide an example of the final script:
<?php
$ch = curl_init();

curl_setopt($ch, CURLOPT_URL, "https://demo.opencart.com");
curl_setopt($ch, CURLOPT_RETURNTRANSFER, true);
curl_setopt($ch, CURLOPT_USERAGENT, "Mozilla/5.0 (Windows NT 10.0; Win64; x64) AppleWebKit/537.36 (KHTML, like Gecko) Chrome/124.0.0.0 Safari/537.36");

$response = curl_exec($ch);

if ($response === false) {
    echo 'cURL error: ' . curl_error($ch);
} else {
    echo $response;
}

curl_close($ch);
?>
This will fetch the entire HTML code of the requested page. We need to parse the retrieved code to extract specific data, and for this, we’ll need another library.
Parsing HTML with Simple HTML DOM Parser
Let’s refine the script we discussed earlier to extract only the relevant data from the page. To do this, before initializing the cURL session, we’ll include an additional library:
require 'simple_html_dom.php';If you’re using Composer for dependency management, you’ll need to add the Simple HTML DOM Parser to your composer.json file:
    "require": {
        "sunra/php-simple-html-dom-parser": "^1.5.2"
    }
Then, update your dependencies using the command:
composer updateOnce that’s done, you can import the library into your script:
require 'vendor/autoload.php';
use Sunra\PhpSimple\HtmlDomParser;
The request initialization and configuration steps remain the same. We’ll only modify the response handling part:
if ($response === false) {
    echo 'cURL error: ' . curl_error($ch);
} else {
    // Here will be parsing process
}
Parse the entire page as HTML code:
$html = HtmlDomParser::str_get_html($response);Next, extract and display all product data:
    $products = $html->find('.col');

    foreach ($elements as $element) {
        $image = $element->find('img', 0)->src;
        $title = $element->find('h4', 0)->plaintext;
        $link = $element->find('h4 > a', 0)->href;
        $desc = $element->find('p', 0)->plaintext;
        $old_p_element = $element->find('span.price-old', 0);
        $old_p = $old_p_element ? $old_p_element->plaintext : '-';
        $new_p = $element->find('span.price-new', 0)->plaintext;
        $tax = $element->find('span.price-tax', 0)->plaintext;

        echo 'Image: ' . $image . "\n";
        echo 'Title: ' . $title . "\n";
        echo 'Link: ' . $link . "\n";
        echo 'Description: ' . $desc . "\n";
        echo 'Old Price: ' . $old_p . "\n";
        echo 'New Price: ' . $new_p . "\n";
        echo 'Tax: ' . $tax . "\n";
        echo "\n";
    }
At the end, we will free up resources:
$html->clear();This will provide us with information about all the products on the page, and we will display it in a user-friendly format. Next, we will explain how to save this data to a file for easier access and manipulation.
Data Storage and Manipulation
Data storage is a crucial aspect of the data collection process. Scraped data is commonly saved in JSON, databases, or CSV formats, depending on its intended use. JSON is suitable for further processing or transmission, databases provide organized storage and retrieval, and CSV offers simplicity and compatibility.
Cleaning and Processing Data
Data cleaning is an essential step in data preprocessing. It ensures the accuracy and consistency of data before storing or analyzing it. It involves identifying and correcting errors, inconsistencies, and unwanted patterns in the data. This can help prevent calculation errors, data analysis, and machine learning models.
First, it’s crucial to clean the text from any unnecessary HTML tags that might have remained from formatting. This can be done using the strip_tags() function:
$cleanText = strip_tags($dirtyText);Additionally, you can remove any whitespace characters from the beginning and end of the text or string:
$cleanText = trim($dirtyText);To eliminate or replace unwanted characters, such as special symbols, the character replacement function is useful:
$cleanText = preg_replace('/[^A-Za-z0-9\-]/', '', $dirtyText);Sometimes, errors may occur if the variable doesn’t contain any data. In such cases, you can replace the empty value with a default one:
$cleanText = empty($dirtyText) ? 'default' : $dirtyText;By employing these techniques, you can effectively prepare your raw dataset for subsequent storage. This is paramount, as an accidentally left space at the end of a line could lead to calculation errors or data corruption.
Storing Scraped Data
Instead of printing the retrieved data to the screen, we can save it to a CSV file by creating a data array and writing it. Let’s modify the data retrieval section to store the data in a variable instead of displaying it:
    $products = $html->find('.col');
    $data = [];

    foreach ($products as $element) {
        $image = $element->find('img', 0)->src;
        $title = $element->find('h4', 0)->plaintext;
        $link = $element->find('h4 > a', 0)->href;
        $desc = $element->find('p', 0)->plaintext;
        $old_p_element = $element->find('span.price-old', 0);
        $old_p = $old_p_element ? $old_p_element->plaintext : '-';
        $new_p = $element->find('span.price-new', 0)->plaintext;
        $tax = $element->find('span.price-tax', 0)->plaintext;

        $data[] = [
            'image' => $image,
            'title' => $title,
            'link' => $link,
            'description' => $desc,
            'old_price' => $old_p,
            'new_price' => $new_p,
            'tax' => $tax
        ];
    }
Create a CSV file and write the data:
    $csvFile = fopen('products.csv', 'w');
    fputcsv($csvFile, ['Image', 'Title', 'Link', 'Description', 'Old Price', 'New Price', 'Tax']);
    foreach ($data as $row) {
        fputcsv($csvFile, $row);
    }
    fclose($csvFile);
To save the data in JSON format, we can use the same data array created earlier:
file_put_contents('products.json', json_encode($data, JSON_PRETTY_PRINT));Saving data to a database requires establishing a connection and inserting data row by row. The specific method for writing and connecting will vary depending on the chosen database management system (DBMS).
Advanced Techniques
To scrape data more efficiently, you need to employ more advanced methods and libraries that enable data collection from a wider range of sources. This section delves into additional techniques and provides examples of scraping data from dynamic web pages, utilizing proxies, and enhancing scraping speed.
Handling Dynamic Content
Scraping dynamic JavaScript-generated content can be challenging using traditional web scraping techniques. Here are two common approaches:
- Headless Browsers. Utilize libraries that enable interaction with headless browsers. This allows you to control the scraping process and simulate user behavior, reducing the risk of blocking. However, PHP requires advanced skills and isn’t the most suitable language for headless browsers.
- Web Scraping APIs. Employ specialized APIs designed for scraping dynamic content. These APIs often provide proxy support, enabling access to region-specific data. Additionally, data collection occurs on the API provider’s side, ensuring your security and anonymity.
For example, let’s create a script to collect the same data but only using HasData’s web scraping API. To do this, sign up on our website and copy your API key from your account.
Create a new PHP script and initialize a new session:
$curl = curl_init();Set request parameters, including CSS selectors and your API key:
curl_setopt_array($curl, [
    CURLOPT_URL => "https://api.hasdata.com/scrape/web",
    CURLOPT_RETURNTRANSFER => true,
    CURLOPT_CUSTOMREQUEST => "POST",
    CURLOPT_POSTFIELDS => json_encode([
        'url' => 'https://demo.opencart.com/',
        'proxyCountry' => 'US',
        'proxyType' => 'datacenter',
        'extractRules' => [
            'Image' => 'img @src',
            'Title' => 'h4',
            'Link' => 'h4 > a @href',
            'Description' => 'p',
            'Old Price' => 'span.price-old',
            'New Price' => 'span.price-new',
            'Tax' => 'span.price-tax'
        ]
    ]),
    CURLOPT_HTTPHEADER => [
        "Content-Type: application/json",
        "x-api-key: PUT-YOUR-API-KEY"
    ],
]);
Make the request and display the result:
$response = curl_exec($curl);
$err = curl_error($curl);

curl_close($curl);

if ($err) {
    echo "cURL Error #:" . $err;
} else {
    echo $response;
}
This example demonstrates using a scraping API to gather data from any website. However, if the website you’re interested in has its own dedicated scraping API, it’s generally recommended to use that instead. This will typically provide you with the most comprehensive data in the most straightforward manner.
Parallel Scraping
You’ll need another library that provides the necessary functionality to work with streams. For example, we’ll use the Guzzle library, which is well-suited for making requests and parsing data. To get started, add its import to Composer or import the library directly:
    "require": {
        "guzzlehttp/guzzle": "^7.7"
    }
Update Composer and specify the import in the script:
require 'vendor/autoload.php';

use GuzzleHttp\Client;
use GuzzleHttp\Pool;
use GuzzleHttp\Psr7\Request;
use GuzzleHttp\Exception\RequestException;
Place the URLs of the pages you want to scrape into a variable:
$urls = [
    "https://demo.opencart.com",
    "https://example.com"
];
Create an HTTP Client to handle the requests:
$client = new Client();

$requests = function ($urls) {
    foreach ($urls as $url) {
        yield new Request('GET', $url);
    }
};
Create a multiprocessing pool with 2 threads:
$pool = new Pool($client, $requests($urls), [
    'concurrency' => 2,
    'fulfilled' => function ($response, $index) {
        echo "Response received from request #$index: " . $response->getBody() . "\n";
    },
    'rejected' => function (RequestException $reason, $index) {
        echo "Request #$index failed: " . $reason->getMessage() . "\n";
    },
]);
Initiate the transfers and create a promise:
$promise = $pool->promise();Then, wait for the pool of requests to complete:
$promise->wait();Overall, this multiprocessing approach significantly enhances the speed and efficiency of data scraping tasks.
Rotating Proxies
To mask your IP address while scraping, as well as to bypass various restrictions, you can use proxies. We have already discussed what proxies are, why you should use them, and where to find both paid and free proxies, so in this tutorial, let’s move on to practical applications.
We will take the script we discussed earlier as a basis and add the use of random proxies from the list. To do this, we will create a variable and add proxies to it:
$proxies = [
    'http://38.10.90.246:8080',
    'http://103.196.28.6:8080',
    'http://79.174.188.153:8080',
];
Then we will slightly modify the request execution to take into account the proxies:
$requests = function ($urls, $proxies) {
    foreach ($urls as $url) {
        $proxy = $proxies[array_rand($proxies)];
        yield new Request('GET', $url, ['proxy' => $proxy]);
    }
};

$pool = new Pool($client, $requests($urls, $proxies), [
    'concurrency' => 2,
    'fulfilled' => function ($response, $index) {
        echo "Response received from request #$index: " . $response->getBody() . "\n";
    },
    'rejected' => function (RequestException $reason, $index) {
        echo "Request #$index failed: " . $reason->getMessage() . "\n";
    },
]);
The rest of the code will remain the same, but now, a random line with a proxy from the list stored in the variable will be selected for each request. This approach will allow you to avoid blocking for each individual proxy longer and increase the overall reliability of the script.
Add Scraping Task to Cron
PHP is a scripting language, and it is not well-suited for continuous operation. It is more suitable for periodic execution, performing tasks and then closing the script. Therefore, if you need to collect data constantly, it will be more convenient to set up automatic execution at a specific time or after a certain interval.
To solve this task in Linux systems, you can use Crontab, which allows you to create task schedules. To add script execution to the schedule, run the terminal and execute the command:
crontab -eThis will launch Cron tasks for editing. At the end of the file, you need to write data in the format “when to execute - tool to execute with - what to execute”. For example, to run the script /home/comp/php_scripts/scraper.php using /usr/bin/php every minute, you need to add the following to the end of the file:
* * * * * /usr/bin/php /home/comp/php_scripts/scraper.phpIt should look like this:
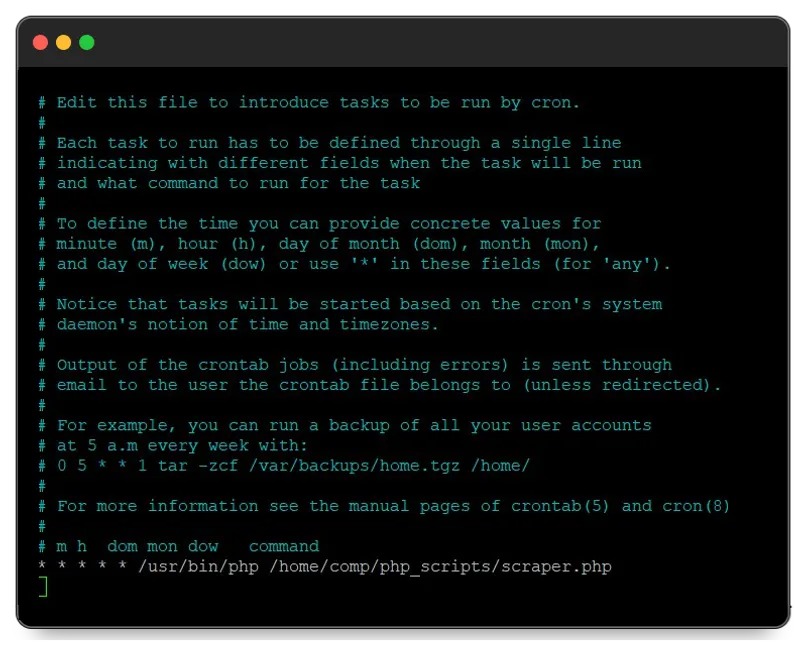
Once you’ve made your changes, save the file using the keyboard shortcut Ctrl+O. The script will then start running at the desired frequency.
Conclusion
PHP provided a robust and flexible platform for web scraping, supported by powerful tools like cURL and Simple HTML DOM Parser. Writing a scraper in PHP allows the script to be executed on the server rather than on a personal computer, leveraging server resources for convenience. Additionally, using scheduling tools like Crontab, the script could be set to run at regular intervals, making it highly convenient for continuous data extraction.
This article explored the complete process of creating such a scraper. We started with setting up the environment and installing the necessary components. We then made HTTP requests, parsed the retrieved data, and saved the data to a file. We also covered creating simple tools and techniques to make your script more efficient and useful.
Using PHP for web scraping, you could automate data collection and processing, ensuring that your tasks were performed efficiently and reliably on server resources.
