Web Scraping with Playwright and Python
Playwright is an async library that lets you simulate real user behavior through a web driver. It’s not as popular as Selenium or Pyppeteer for scraping, but it has some clear advantages that make it a better option in many cases.
Why Playwright?
Besides letting you launch a browser and mimic real user behavior, Playwright has a few things that make it stand out compared to Selenium or Pyppeteer:
- Multiple browsers out of the box. Right after installation, Playwright supports Chromium, Firefox, and WebKit.
- Extract dynamic content. It works equally well with static and dynamic websites because it runs a real browser and fetches data only after the page fully loads.
- Mobile emulation. You can simulate how a mobile browser behaves, if needed.
- Codegen support. Unlike many similar tools, Playwright can record your actions on a page and turn them into Python code you can reuse for scraping.
Other than that, Playwright is pretty similar to Selenium and Pyppeteer. Like Pyppeteer, it supports async/await and works well with asynchronous code. Still, we put together a short article where we compare them side by side, just in case you’re deciding which one to pick.
Requirements
If you don’t have Python installed yet, check out our guide to get it set up. Once that’s done, install Playwright:
pip install playwrightThis installs just the library, no browsers included. To get the browsers, run:
playwright installThat’ll download Chromium, Firefox, and WebKit. You only need to do this once after installing the library.
To see all available commands, run:
playwright helpThere you’ll find things like how to take a screenshot right from the terminal.
If you’re planning to use NodeJS instead of Python, we’ve got a separate guide for that. Check out how to use Playwright with NodeJS.
Minimal Working Example (MWE)
If you just want to see the simplest Playwright code to scrape headlines and text from a page, here it is:
import asyncio
from playwright.async_api import async_playwright


async def run():
    async with async_playwright() as p:
        browser = await p.chromium.launch(headless=True)
        page = await browser.new_page()
        await page.goto("https://example.com")

        h1 = await page.text_content("h1")
        print("H1:", h1)


        paragraphs = await page.query_selector_all("p")
        for i, p_tag in enumerate(paragraphs, 1):
            text = await p_tag.inner_text()
            print(f"Paragraph {i}:", text)


        await browser.close()


asyncio.run(run())
This will open the page, grab all elements with h1 or p tags, and print them out.
One thing to note: The headless setting in the browser config. If it’s set to True, the browser runs in the background without opening a window.
Also, keep in mind that Playwright is async. You’ll need to use asyncio to make it work properly.
Basic Scraping with Playwright
Let’s walk through a hands-on example and scrape product data from a test e-commerce page.
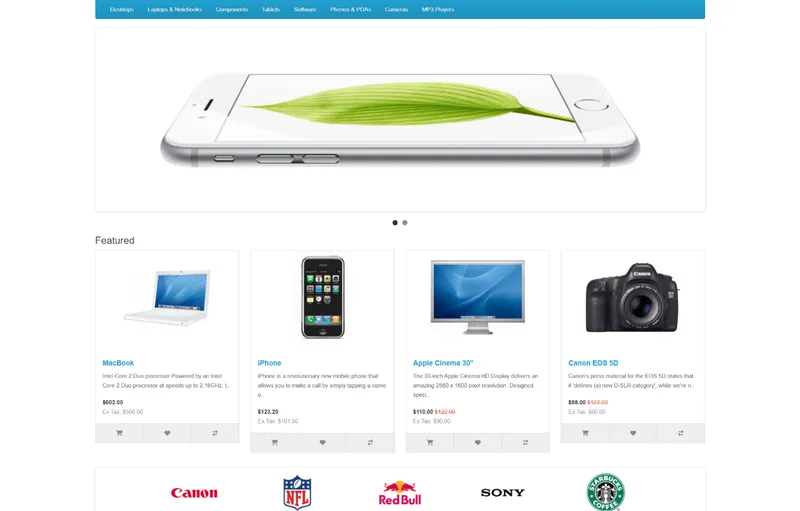
We’ll scrape the product name, description, image, and price.
Locate Elements
To find elements on the page, you can use either CSS selectors or XPath, Playwright supports both. The commands are the same:
query_selector– for a single element.query_selector_all– for multiple elements.
We’ve already compared CSS and XPath in another post, so if you’re not sure which to use, check that out.
Open DevTools (F12 or right-click and Inspect) and start picking out the selectors for the product info.
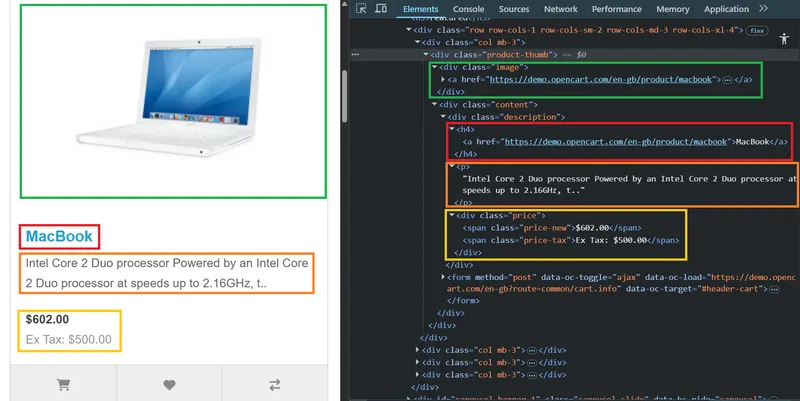
Let’s put all the selectors and XPath expressions of the elements into a table:
| Element | CSS Selector | XPath Expression |
|---|---|---|
| Product link | h4 a | .//h4/a |
| Product image | .image img | .//div[@class=“image”]/a/img |
| Product title text | h4 a (use inner_text) | .//h4/a/text() |
| Description | .description p | .//div[@class=“description”]/p |
| Price (new) | .price-new | .//span[@class=“price-new”] |
| Price (tax) | .price-tax | .//span[@class=“price-tax”] |
Each product is inside a .product-thumb container. So first, we need to collect all elements with that class, then loop through each one and extract the name, image, description, and price.
Scrape Titles and Text
Now that we’ve set up the selectors for the main elements, let’s actually extract the data.
First, the product title:
title_el = await product.query_selector("h4 a")
title = await title_el.inner_text() if title_el else ""
The product description:
desc_el = await product.query_selector(".description p")
description = await desc_el.inner_text() if desc_el else ""
The product price:
price_el = await product.query_selector(".price .price-new")
price = await price_el.inner_text() if price_el else ""
In all these cases, we’re just getting the text inside the element. But you can also get attribute values. For example, to get the product page link from the title element:
link = await title_el.get_attribute("href") if title_el else ""If you need other data, just use the right selector.
Scrape Images
Scraping images works the same way as links, get the value of the attribute that holds the image URL. To start, first, find the element that contains the image, then get the value of its attribute:
img_el = await product.query_selector(".image img")
img_url = await img_el.get_attribute("src") if img_el else ""
That gives you the image link. To save the image, you’ll need to send a request to that URL and write the response to a file with the correct extension.
For Multiple Elements
Let’s upgrade the script to get data from all products on the page, not just one. Just wrap the data extraction logic in a loop that goes through all product cards:
products = await page.query_selector_all(".product-thumb")
for product in products:
    # Your code here
The rest of the code stays the same.
Advanced Scraping Techniques
Now that we’ve covered the basics of scraping a web page, let’s look at some slightly more advanced (or just useful) tricks to make your scraper better.
Click Buttons and Text Input
To click a button, you need to find the right selector and use .click:
await page.click("selector")For example, clicking a Submit button might look like this:
await page.click("input[type='submit']")Filling out a text field is pretty similar:
await page.fill("selector", "value")Like this:
await page.fill("input[name='text']", "example")This works the same way, no matter the page. The only thing that changes is the selector and the value.
Pagination and Infinite Scrolling
Pagination lets you move between pages of content. Infinite scroll means more data loads as you scroll down, like on Google Maps.
Let’s start with pagination. You’ll use .click again. Ideally, target a “next” button rather than a specific page number. It’s more flexible.
Here’s a basic example:
next_button = await page.query_selector("li.next > a")
if next_button:
    await next_button.click()
else:
    break
Wrap that in a loop to keep clicking through pages:
while (True):

    # Your code here

    next_button = await page.query_selector("li.next > a")
    if next_button:
        await next_button.click()
    else:
        break
If there’s no next button, the loop stops. And one more thing, don’t do this:
await asyncio.sleep(5)Do this instead:
await page.wait_for_selector(".product-thumb")Waiting for a specific element is just more reliable than guessing how long the page needs to load.
Sometimes, to handle pagination or infinite scroll, you’ll need to extract data using custom JavaScript. For example:
temp = await page.evaluate("your JS code")Now, for infinite scroll. Here’s a common pattern:
previous_height = await page.evaluate("document.body.scrollHeight")
while True:
    await page.evaluate("window.scrollTo(0, document.body.scrollHeight)")
    await page.wait_for_timeout(1000)


    new_height = await page.evaluate("document.body.scrollHeight")
    if new_height == previous_height:
        break
    previous_height = new_height
You scroll to the bottom, wait a bit, and check if the page height has changed. If not, you’ve reached the end.
Add User Agents
To set a User Agent, do it after launching the browser but before visiting the page:
        browser = await p.chromium.launch(headless=False)
        user_agent = "Mozilla/5.0 (Windows NT 10.0; Win64; x64) AppleWebKit/537.36 (KHTML, like Gecko) Chrome/135.0.0.0 Safari/537.36"
        context = await browser.new_context(user_agent=user_agent)
        page = await context.new_page()
        await page.goto("https://demo.opencart.com/")
You can use a real User Agent from your own browser or find one of the latest ones on our site.
Handling Errors
If you don’t want your script to crash when something goes wrong, the best move is to guess what kind of issues might happen and handle them upfront.
We covered the common error types in the article about retrying requests in Python, so I won’t repeat all that here. Instead, here’s a simple catch-all block that logs the error:
try:
    # Your code here


except Exception as e:
    print(f"Unexpected error: {e}")
This way, your script keeps running even if something breaks, and you still get a clear message about what went wrong.
Author’s tip: When catching errors, take a screenshot.
except Exception as e:
    await page.screenshot(path="error.png")
It’ll help you debug faster. Not a replacement for logs, but a good addition.
Screenshot Capture of Web Pages
Let’s add screenshot saving to your scraping script. It can be handy if you want to keep a visual history of what you scraped.
Right after loading the page, just do:
await page.screenshot(path="...")Replace ”…” with the path and filename you want. For example:
await page.screenshot(path=f" screenshots/test.png")You can also save the page as a PDF in a similar way:
await page.pdf(path=f" pdf/page.pdf")To avoid overwriting files, you can add a timestamp to the filename. First, import this:
from datetime import datetimeThen generate the name like this:
timestamp = datetime.now().strftime("%Y-%m-%d_%H-%M-%S")
filename = f"screenshots/screenshot_{timestamp}.png"
await page.screenshot(path=filename)
This way, each screenshot gets a unique name, and you’ll always know when it was taken.
Save Scraped Data
At the end, we save all the scraped data to a file. Since we’re also taking screenshots during scraping, we’ll use the current date and time as the filename.
First, import a couple of extra libraries:
import json
import csv
Set up the filenames based on the current timestamp:
timestamp = datetime.now().strftime("%Y-%m-%d_%H-%M-%S")
json_filename = f"json/{timestamp}.json"
csv_filename = f"csv/{timestamp}.csv"
Save the data to a JSON file:
with open(json_filename, "w", encoding="utf-8") as f:
    json.dump(data, f, indent=2, ensure_ascii=False)
And also as CSV:
with open(csv_filename, "w", encoding="utf-8", newline="") as f:
    writer = csv.DictWriter(f, fieldnames=["text", "author"])
    writer.writeheader()
    writer.writerows(data)
If you’re building a price tracker, you can log timestamped entries into a single file, instead of creating new ones each time.
Full Example
Here’s the full script with everything put together:
import asyncio
import json
import csv
from datetime import datetime
from pathlib import Path
from playwright.async_api import async_playwright


async def run():
    async with async_playwright() as p:
        browser = await p.chromium.launch(headless=False)


        user_agent = (
            "Mozilla/5.0 (Windows NT 10.0; Win64; x64) AppleWebKit/537.36 "
            "(KHTML, like Gecko) Chrome/135.0.0.0 Safari/537.36"
        )
        context = await browser.new_context(user_agent=user_agent)
        page = await context.new_page()


        Path("screenshots").mkdir(exist_ok=True)
        Path("json").mkdir(exist_ok=True)
        Path("csv").mkdir(exist_ok=True)


        scraped_data = []


        try:
            await page.goto("https://demo.opencart.com/")
            await page.wait_for_selector(".product-thumb")


            product_blocks = await page.query_selector_all(".product-thumb")


            for product in product_blocks:
                title_el = await product.query_selector("h4 a")
                title = await title_el.inner_text() if title_el else ""
                link = await title_el.get_attribute("href") if title_el else ""


                desc_el = await product.query_selector(".description p")
                description = await desc_el.inner_text() if desc_el else ""


                price_el = await product.query_selector(".price .price-new")
                price = await price_el.inner_text() if price_el else ""


                img_el = await product.query_selector(".image img")
                img_url = await img_el.get_attribute("src") if img_el else ""


                scraped_data.append({
                    "title": title,
                    "link": link,
                    "description": description,
                    "price": price,
                    "image": img_url
                })


            timestamp = datetime.now().strftime("%Y-%m-%d_%H-%M-%S")
            screenshot_path = f"screenshots/screenshot_{timestamp}.png"
            await page.screenshot(path=screenshot_path)
            print(f"Screenshot saved: {screenshot_path}")

        except Exception as e:
            print(f"Unexpected error: {e}")
        finally:
            await browser.close()


        if scraped_data:
            timestamp = datetime.now().strftime("%Y-%m-%d_%H-%M-%S")
            json_filename = f"json/products_{timestamp}.json"
            csv_filename = f"csv/products_{timestamp}.csv"


            with open(json_filename, "w", encoding="utf-8") as f:
                json.dump(scraped_data, f, indent=2, ensure_ascii=False)
            print(f"Data saved to: {json_filename}")


            with open(csv_filename, "w", encoding="utf-8", newline="") as f:
                writer = csv.DictWriter(f, fieldnames=scraped_data[0].keys())
                writer.writeheader()
                writer.writerows(scraped_data)
            print(f"Data saved to: {csv_filename}")


asyncio.run(run())
It’s basically the same as the first example, but with more data collected, saved to both JSON and CSV, and a screenshot of the page. Also, if something breaks, the script won’t crash; it just prints the error.
Useful Commands
Besides everything we already covered, Playwright has a few more tricks that might come in handy.
Record Actions Into Code
If you don’t feel like writing code by hand, Playwright can do it for you. Just run this in your terminal:
playwright codegen https://example.comIt’ll open a browser window and load the page you specified:
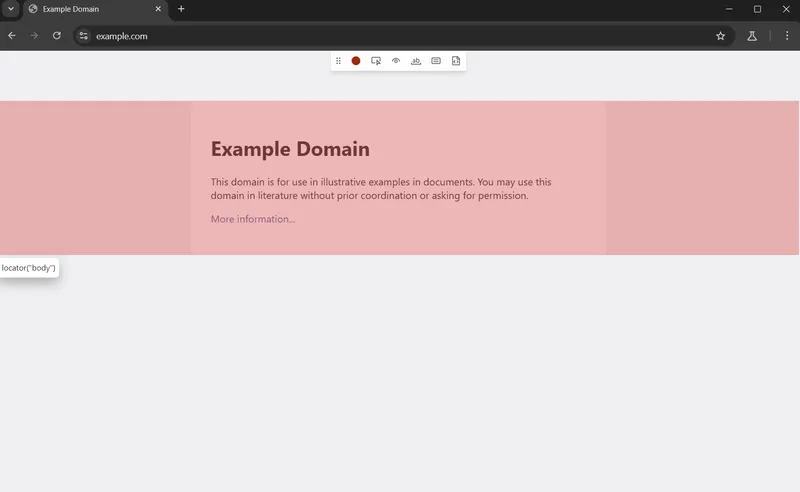
As you click around, Playwright will generate the code for those actions in real-time:
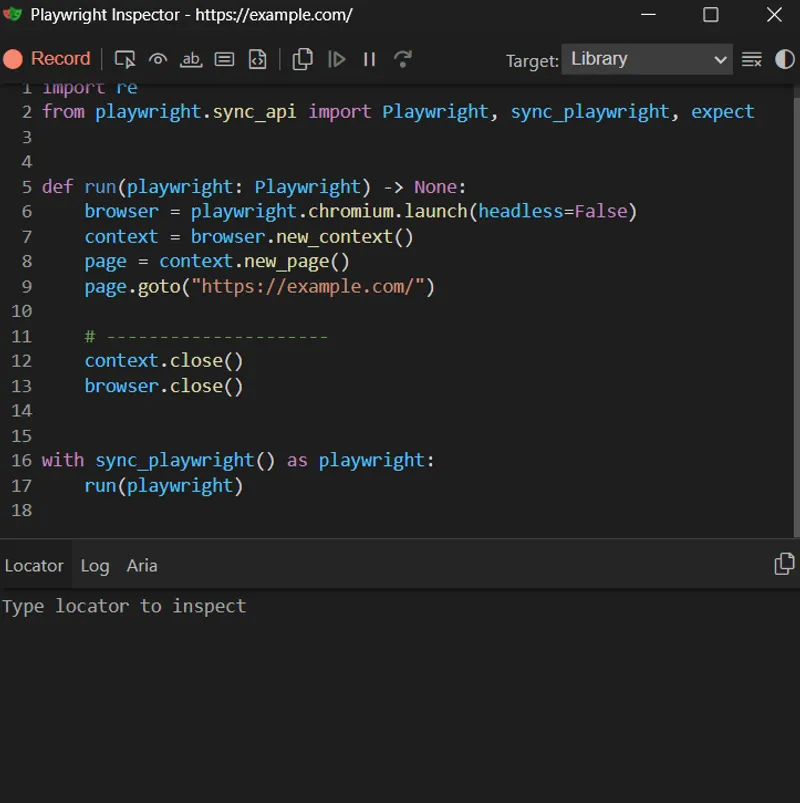
That’s why testers like it: codegen quickly automates UI interactions, saving time on repetitive tasks. But most web scraping developers don’t use it. If you code a lot, it’s usually faster to just write things yourself. Still, the inspector can be helpful once in a while.
That’s why testers like it. But for some reason, the rest of the dev community hasn’t really picked it up.
Manage Browser
To install a specific browser, use this:
playwright install chromiumTo remove:
playwright uninstall You can also specify the browser, same as with install.
Conclusion
Whether you’re testing your web app, scraping JavaScript-heavy pages, or just tired of Selenium slowing you down, Playwright delivers. It’s fast, modern, and packed with features that actually make your life easier, like built-in auto-waits, multi-browser support, and even code generation to speed up your workflow.
Need to scrape dynamic content? Done. Automate a login flow? Easy. Run real browser tests in parallel? No sweat. And if you’re using Scrapy, scrapy-playwright lets you run a headless browser right inside Scrapy spiders.
Playwright isn’t just an upgrade, it’s a powerful tool for anyone serious about browser automation.
