Best 6 JavaScript and NodeJS Libraries for Web Scraping
JavaScript is one of the most popular programming languages for Internet work. It has well-documented resources, an active community, and many libraries for various purposes.
However, if you want to use JavaScript outside of a web browser, you must use a wrapper called Node.js. So today, we will also explain how to set up and prepare the environment for JavaScript scraping.
Preparing for Web Scraping using JavaScript
Before we compare libraries, let’s prepare an environment where we can use these libraries. Choosing a library is easier when you know its features, pros, and cons. Therefore, we will show how to use each of the reviewed libraries. But you can explore our other articles if you’re looking to scrape data in other languages like C# or Python.
Installing the Environment
We have previously discussed setting up the environment for web scraping with NodeJS. So, we won’t go into it again, but we’ll simply remind you what you need to do:
- Download the latest stable version of NodeJS from the official website.
- Make sure the installation is successful by checking the installed NodeJS version:
node -v- Update NPM:
npm install -g npm- Initialize the NPM:
npm init -yWe don’t need anything else. We will use Visual Studio Code as our code editor, but any text editor will do, for example, Sublime.
Researching the Structure of the Site
We use this demo site to make the library usage examples more illustrative. Let’s look at it in detail. To do this, go to the site and open the DevTools (F12 or right-click on a page and select Inspect).
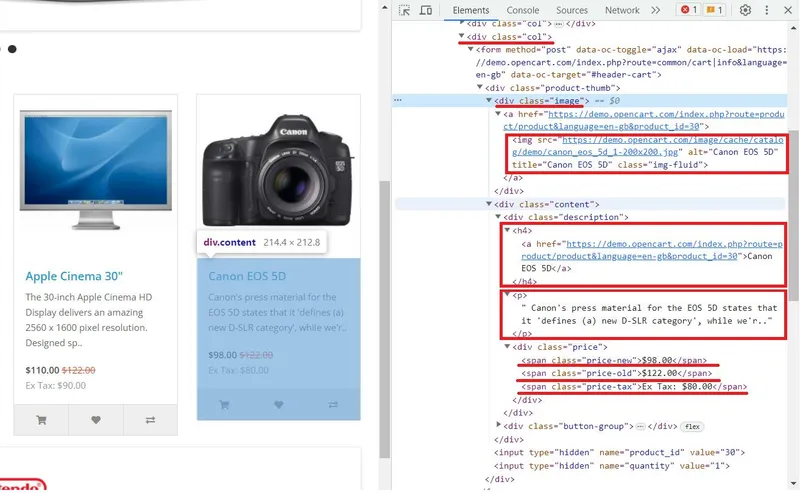
After analyzing the page, we can draw the following conclusions:
- Each product is in the div tag with the class “
col”. - Product image is in the img tag in the attribute src.
- Product name is in
<h4>tag. - Product description is in
<p>tag. - The old price is in the
<span>tag with the class “price-old”. - New price is in the
<span>tag with the class “price-new”. - Tax is in the
<span>tag with the class “price-tax”.
Now that we have our environment set up and have analyzed the page on which we will show the capabilities of the various libraries, we can explore JavaScript web scraping libraries.
Choosing the Best JavaScript Library for Web Scraping

There are too many NPM packages that you can use to scrape data, and we can’t review them all. However, if we choose the most convenient and popular ones, here they are:
- Axios with Cheerio. Axios is a popular JavaScript library for making HTTP requests, and Cheerio is a fast and flexible library for parsing HTML. Together they provide an easy way to execute HTTP requests and parse HTML in web scraping tasks. Instead of Axios, we can use any query library, such as Unirest. It is a lightweight and easy-to-use library for executing HTTP requests.
- HasData SDK. It is a library that allows you to scrape dynamic and static web pages, takes care of captchas and blocker avoidance, and provides the ability to use proxies.
- Puppeteer is a widely used browser automation library. So, it is very useful in web scraping.
- Selenium is a cross-browser automation system that supports various programming languages, including JavaScript. We have already talked about it in Python and R.
- X-Ray is a JavaScript library for web scraping and data extraction.
- Playwright is a powerful headless browser automation and testing environment developed by Microsoft.
Let’s look at each to determine which library is best and make an informed choice.
Axios and Cheerio
The most accessible JavaScript scraping library is Cheerio. However, because it cannot perform site queries, it is used with a query library such as Axios. Together, these libraries are used quite often and are great for beginners.
Advantages
This is an excellent Javascript web scraping library that is well-suited for beginners. It offers extensive parsing and web page processing capabilities. It is easy to learn, has well-documented resources, and is a highly active community. Thanks to that, you can always find help and support even with issues.
Disadvantages
Unfortunately, this library is suitable only for scraping static pages. Since it is used with the request’s library, getting data from pages with dynamically generated content is impossible. So, you can make a good parser using it.
Example of Scraper
Before using this library, let’s install the necessary npm packages:
  npm install axios
  npm install cheerio
Now create a new *.js file to write our script. First, import the libraries:
const axios = require('axios');
const cheerio = require('cheerio');
Now let’s query the demo site and create an error handler.
axios.get('https://demo.opencart.com/')
  .then(response => {

    // Here will be code

  })
  .catch(error => {
    console.log(error);
  });
We have specifically marked where we will continue to write code. All we have to do is parse the page’s resulting HTML code and display the data on the screen. Let’s start with parsing:
    const html = response.data;
    const $ = cheerio.load(html);
    console.log($.text())
    const elements = $('.col');
Here we have selected elements with the class “.col”. We have already discussed this during the page analysis stage - all the products have the parent class “.col”. Now let’s go through each of the found elements and get specific data for each product:
    elements.each((index, element) => {
      const image = $(element).find('img').attr('src');
      const title = $(element).find('h4').text();
      const link = $(element).find('h4 > a').attr('href');
      const desc = $(element).find('p').text();
      const old_p = $(element).find('span.price-old').text();
      const new_p = $(element).find('span.price-new').text();
      const tax = $(element).find('span.price-tax').text();

      // Here will be code
    });
The last thing we need to do is to add the display of items as we go through them.
      console.log('Image:', image);
      console.log('Title:', title);
      console.log('Link:', link);
      console.log('Description:', desc);
      console.log('Old Price:', old_p);
      console.log('New Price:', new_p);
      console.log('Tax:', tax);
      console.log('');
Now, if we run our script, we get the following result:
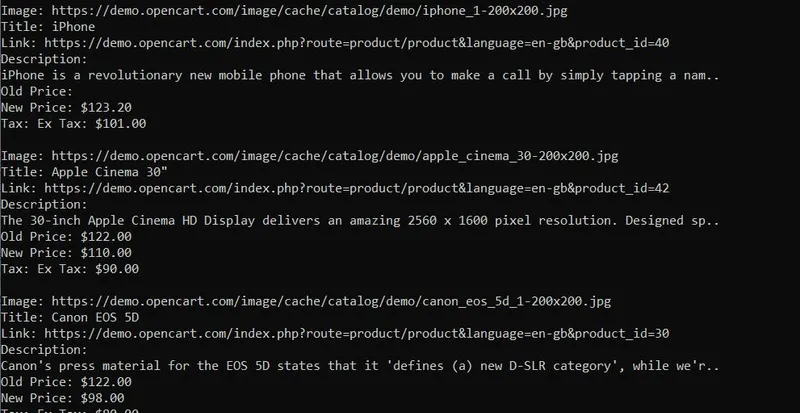
As we can see, we got the data on all elements. Now you can continue processing them or, for example, save them to a CSV file. Axios and Cheerio provide excellent scraping functionality. And if you are a beginner, choosing these libraries for web scraping will be a good decision. If you want to know more about these tools, you can read our article on how to scrape with Axios and Cheerio.
HasData SDK
Another option that is ideal for beginners is HasData SDK. It is also simple (and even easier) to use than Axios and Cheerio, but at the same time, it provides more functionality than the libraries we will consider next.
Advantages
HasData SDK is great for scraping both static and dynamic web pages. As we developed this web scraping library JavaScript, and it is based on the web scraping API, it offers several advantages over other libraries. It handles captcha solving and helps avoid blocking and use of proxies.
The user must only sign up on our site and copy the API key from his account. After signing up, you will get free credits to test our functionality and features.
Disadvantages
It’s hard for us to talk about the disadvantages of our library because we are constantly refining and improving it. However, if you use Extraction Rules to extract data, they will come back in different groups that are not linked together, which may not be very convenient. But the API also returns all the code of the page, so it is always possible to get the data in the right form.
Example of Scraper
So, let’s look at an example of how to use our library. First, install the appropriate NPM package.
npm i @scrapeit-cloud/scrapeit-cloud-node-sdkNow create a script file and connect the library:
const ScrapeitSDK = require('@scrapeit-cloud/scrapeit-cloud-node-sdk');Write the main function like in the last example, and write a block to catch errors.
(async() => {
    const scrapeit = new ScrapeitSDK('YOUR-API-KEY');
    try {

        // Here will be code

    } catch(e) {
      console.log(e.message);
    }
  })();
The only thing left to do is to run the query and display the result:
const response = await scrapeit.scrape({
          "extract_rules": {
                "Image": "img @src",
                "Title": "h4",
                "Link": "h4 > a @href",
                "Description": "p",
                "Old Price": "span.price-old",
                "New Price": "span.price-new",
                "Tax": "span.price-tax"
              },
          "url": "https://demo.opencart.com/",
          "screenshot": true,
          "proxy_country": "US",
          "proxy_type": "datacenter"
        });
        console.log(response);
The output will be a JSON response with the same results as in the last example. In this way, we get the same data but in a much simpler manner.
When a website is small and doesn’t have any protection like a captcha or blocks, this may not be very noticeable. However, when you scrape large amounts of data within a short time from websites like Google, Amazon, or Zillow, the benefits of using our web scraping API become obvious.
Puppeteer
Puppeteer is a more complex JavaScript library for web scraping, automation, and testing.
Advantages
It allows you to call the headless browser to simulate a real user’s behavior and automate browser tasks. In addition, because there is a page transition and the result is scraped after the web page loads, you can scrape not only static web pages but also dynamic ones. In addition, you can perform actions on the web page, be it clicking on links, filling out forms, or scrolling.
Disadvantages
Among the disadvantages is that the library is more difficult for beginners than the ones mentioned above. However, this should not be a significant challenge thanks to the active community and the large number of examples.
Example of Scraper
Let’s start by plugging in the library, creating a basic function, and error-catching. Let’s also go straight to the page, using Puppeteer commands to make the transition. Use await browser to wait for the web page to fully load.
const puppeteer = require('puppeteer');

(async function example() => {
  try {
    const browser = await puppeteer.launch();
    const page = await browser.newPage();
    await page.goto('https://demo.opencart.com/');

    const elements = await page.$$('.col');

    // Here will be code

    await browser.close();
  } catch (error) {
    console.log(error);
  }
})();
We also added a search for elements with the “.col” class and a browser close so you don’t forget to do it at the end. Now we can go through all the products and choose the data we need:
for (const element of elements) {
      const image = await element.$eval('img', img => img.getAttribute('src'));
      const title = await element.$eval('h4', h4 => h4.textContent);
      const link = await element.$eval('h4 > a', a => a.getAttribute('href'));
      const desc = await element.$eval('p', p => p.textContent);
      const new_p = await element.$eval('span.price-new', span => span ? span.textContent : '-');
      const new_p = await element.$eval('span.price-new', span => span ? span.textContent : '-');
      const tax = await element.$eval('span.price-tax', span => span ? span.textContent : '-');

      console.log('Image:', image);
      console.log('Title:', title);
      console.log('Link:', link);
      console.log('Description:', desc);
      console.log('Old Price:', old_p);
      console.log('New Price:', new_p);
      console.log('Tax:', tax);
      console.log('');
    }
We used “span ? span.textContent : ’-’” to check for content. For example, if there is no new price, instead of an error, we just put a ”-” in the corresponding element.
However, if the structure does not have such a selector, as with “.price-old”, we will get an error, so let’s consider this option and fix the code a bit.
      const old_p_element = await element.$('span.price-old');
      const old_p = old_p_element ? await old_p_element.evaluate(span => span.textContent) : '-';
If we execute our code, we will get a nicely structured result without errors.
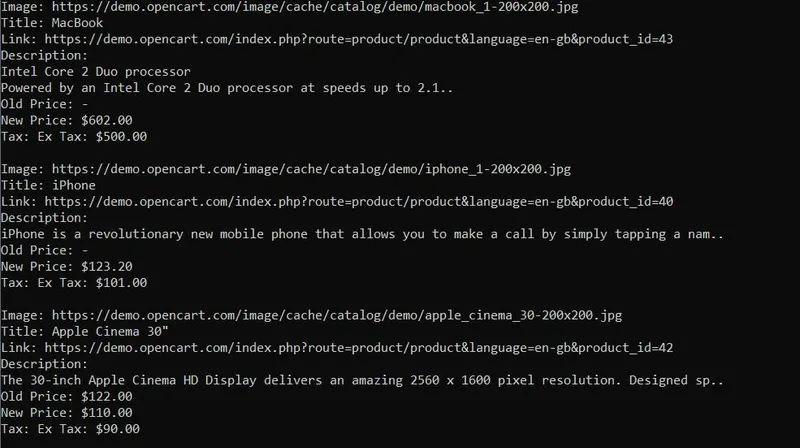
From our experience, using Puppeteer is very convenient. It has many features, functions, and well-written documentation with many examples.
Selenium
Selenium is an open-source platform widely used to automate web browsers. Selenium supports many programming languages, including JavaScript, Python, Java, and C#, making it universal and widely used.
Selenium uses a headless browser, allowing you to simulate user behavior and perform actions on web pages like a human does. This makes it helpful in web scraping, testing web applications, and performing repetitive website tasks.
Advantages
Because of its popularity and ease of use, Selenium has an extensive community in any supported programming language, including JavaScript.
This web scraping JavaScript library is more accessible for some to learn than Puppeteer. It supports a variety of ways to find items, including selectors and XPath.
Disadvantages
Among the disadvantages is that it may seem challenging to learn if you are a beginner in programming.
Example of Scraper
First, we need to install the NPM packages of selenium itself and the webdriver:
npm install selenium
npm install chromedriver
npm install selenium-webdriver
Unlike Puppeteer, where everything is installed immediately with the main package, Selenium requires additional loading of these elements. Therefore, it is essential not to forget anything, otherwise, you may get errors when running the script.
Now let’s create a script file and import the library and the modules we need:
const { Builder, By } = require('selenium-webdriver');
require('selenium-webdriver/chrome');
require('chromedriver');
Otherwise, using Selenium is very similar to Puppeteer, except for how you search for specific items. Therefore, we immediately suggest that you look at a ready-made example:
(async () => {
  try {
    const driver = await new Builder().forBrowser('chrome').build();
    await driver.get('https://demo.opencart.com/');
    const elements = await driver.findElements(By.className('col'));

    for (const element of elements) {
      const image = await element.findElement(By.tagName('img')).getAttribute('src');
      const title = await element.findElement(By.tagName('h4')).getText();
      const link = await element.findElement(By.css('h4 > a')).getAttribute('href');
      const desc = await element.findElement(By.tagName('p')).getText();
      const old_p_element = await element.findElements(By.css('span.price-old'));
      const old_p = old_p_element.length > 0 ? await old_p_element[0].getText() : '-';
      const new_p = await element.findElement(By.css('span.price-new')).getText();
      const tax = await element.findElement(By.css('span.price-tax')).getText();

      console.log('Image:', image);
      console.log('Title:', title);
      console.log('Link:', link);
      console.log('Description:', desc);
      console.log('Old Price:', old_p);
      console.log('New Price:', new_p);
      console.log('Tax:', tax);
      console.log('');
    }

    await driver.quit();
  } catch (error) {
    console.log(error);
  }
})();
As you can see, the difference from using the previous library is quite small. It is expressed using a special module By, which allows you to define the type of element search. In Selenium, there are several options for finding items using the By module:
- By.className( name )
- By.css( selector )
- By.id( id )
- By.js( script, …var_args )
- By.linkText( text )
- By.name( name )
- By.partialLinkText( text )
- By.tagName( name )
- By.xpath( XPath )
Thus, Selenium provides more search possibilities and is a more flexible tool.
X-Ray
X-Ray is another JavaScript library used for web scraping and data extraction. It lets you define the data structure you want to extract data and specify the HTML elements or attributes of interest. It supports various web scraping scenarios, including scraping static HTML pages or pages with dynamic content rendered with JavaScript.
Advantages
X-Ray offers flexibility and ease of use, making it a popular choice for quick web scraping tasks or when you don’t need extensive browser automation. It simplifies data extraction and provides tools for HTML parsing.
Disadvantages
X-Ray is not as popular as Selenium or Puppeteer, so you may have trouble figuring it out.
Example of Scraper
However, let’s install it and see by example whether it is inconvenient or worthy of attention. First, install the necessary NPM package:
npm install x-rayNow create a JavaScript file and import the library into it:
const Xray = require('x-ray');Create an X-ray handler:
const x = Xray();Execute a request and find all the elements in each of the products.
x('https://demo.opencart.com/', '.col', [{
  image: 'img@src',
  title: 'h4',
  link: 'h4 > a@href',
  desc: 'p',
  old_p: 'span.price-old',
  new_p: 'span.price-new',
  tax: 'span.price-tax'
}])
Now all we have to do is to display all the collected data on the screen:
  .then(data => {
    data.forEach(item => {
      const { image, title, link, desc, old_p, new_p, tax } = item;
      console.log('Image:', image);
      console.log('Title:', title);
      console.log('Link:', link);
      console.log('Description:', desc);
      console.log('Old Price:', old_p || '-');
      console.log('New Price:', new_p);
      console.log('Tax:', tax);
      console.log('');
    });
  })
To know what kind of error we encountered during execution, we add an error-catching block just in case:
  .catch(error => {
    console.log(error);
  });
So, we got the same result as in the previous examples.
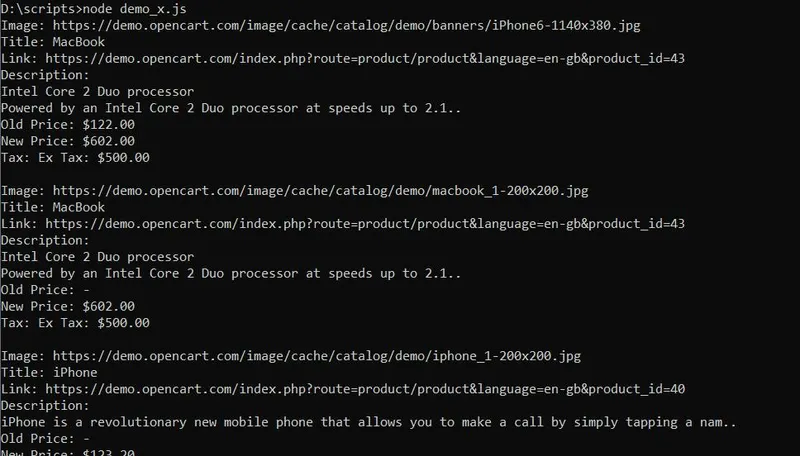
And although we got the same result, the simplicity made it much less time-consuming to write such a script.
Playwright
The last library on our list is Playwright. It is a multifunctional library developed by Microsoft that uses Chromium, Firefox, or WebKit to run queries and collect data.
Advantages
As we said, Playwright can launch the browser to simulate the user activity. It supports headless mode (running the browser in the background without a visible user interface) and headful mode (displaying the browser user interface).
Overall, Playwright offers a complete solution for automating browser and web scraping tasks.
Disadvantages
Although Playwright is a powerful library with many advantages, it is also essential to consider its disadvantages. Playwright’s broad feature set can introduce challenges, especially with simple automation tasks. If you have simple automation requirements, using a lighter-weight library or framework is better, as Playwright may be redundant for simple tasks.
Because Playwright manages a whole browser instance, it requires more system resources than lighter alternatives. Launching the browser and loading web pages can consume a significant amount of CPU and memory, affecting performance if you’re dealing with many browser instances or working in an environment with limited resources.
Example of Scraper
First, install the necessary NPM package:
npm install playwrightCreate a new JavaScript file and include the library in it. Also, specify the main function and add an error-catching block:
const { chromium } = require('playwright');

(async () => {
  try {

    // Here will be code

  } catch (error) {
    console.log(error);
  }
})();
Now start the browser and go to the desired web page. Let’s also specify the command to close the browser so we don’t forget to specify it at the end.
const browser = await chromium.launch();
    const context = await browser.newContext();
    const page = await context.newPage();
    await page.goto('https://demo.opencart.com/');

    // Here will be code

    await browser.close();
And finally, let’s process all the goods, get the data, and display them on the screen:
    const elements = await page.$$('.col');

    for (const element of elements) {
      const image = await element.$eval('img', img => img.getAttribute('src'));
      const title = await element.$eval('h4', h4 => h4.textContent);
      const link = await element.$eval('h4 > a', a => a.getAttribute('href'));
      const desc = await element.$eval('p', p => p.textContent);
      const old_p_element = await element.$('span.price-old');
      const old_p = old_p_element ? await old_p_element.textContent() : '-';
      const new_p = await element.$eval('span.price-new', span => span.textContent);
      const tax = await element.$eval('span.price-tax', span => span.textContent);

      console.log('Image:', image);
      console.log('Title:', title);
      console.log('Link:', link);
      console.log('Description:', desc);
      console.log('Old Price:', old_p);
      console.log('New Price:', new_p);
      console.log('Tax:', tax);
      console.log('');
    }
In this example, you can learn the basics of using the playwright library and determine if it suits your application.
Which JavaScript Web Scraping Library is Best for You?
Choosing the right JavaScript library for web scraping can be a daunting task, especially with a plethora of options available. Your ideal choice will depend on various factors, such as:
- Skill Level: Are you a beginner or an experienced developer? Some libraries are more beginner-friendly, while others offer advanced features that may require a steep learning curve.
- Project Requirements: What are you trying to scrape? Static or dynamic content? Do you need to navigate through pages or interact with the website?
- Community Support: Are you looking for a library with a strong community and extensive documentation?
- Specific Features: Do you need a library that can handle CAPTCHA, proxy rotation, browser automation, web crawling, or just extracting data?
To help you choose the correct library, we have made a comparison table of all the libraries discussed today.
| Library | Features | Dynamic Content Handling | Browser Automation | Community Support |
|---|---|---|---|---|
| Axios with Cheerio | Easy HTTP requests and DOM parsing | No | No | Active |
| Puppeteer | Web scraping framework for browser task automation | Yes | Yes | Active |
| Selenium | Cross-browser support including Chromium browser | Yes | Yes | Active |
| X-Ray | CSS and XPath selectors, data extraction | No | No | Low |
| Playwright | Browser automation and testing framework | Yes | Yes | Active |
For those who are just starting out or want to avoid the challenges of web scraping, the HasData SDK can be a great choice. Developed by us and based on our web scraping API, this library offers several advantages over other options. It can handle both static and dynamic web pages and comes with built-in features to avoid CAPTCHA, manage proxy rotation, and prevent blocking. All these features make it an excellent starting point for your project.
Now that you know more about the JavaScript libraries available, we believe you can make an informed choice based on usability, functionality, and the task at hand.
